Installation
Installation Personnel
Only qualified personnel are permitted to install this product. Two categories of personnel are recognised:
- Professionals: Personnel who are familiar with the working principles and structure of the equipment, and who have been trained or have relevant operational experience.
- Trained personnel: Personnel who have received technical and safety training, possess the required experience, are aware of possible hazards, and are able to take appropriate protective measures in relevant operations.
All installation personnel must:
- Be fully familiar with this document and all applicable related documents.
- Be qualified electricians, knowledgeable of safe electrical wiring practices and familiar with the relevant electrical safety facilities and equipment.
- Take all necessary safety precautions and comply with all local codes and regulations.
- Minimise potential hazards during installation and ensure others in the area receive all necessary safety precautions.
Installation Environment
- Do not install in areas with flammable or explosive gas or smoke. Do not perform any operations near open fire.
- Do not store any flammable or explosive materials in the equipment area. Do not cover or wrap the battery. Overheating may damage the equipment or cause fire.
- Ensure the ventilation vents and heat dissipation systems are not obstructed or covered by other objects while the equipment is running. Ensure adequate airflow to prevent fault due to high temperature or short circuit.
Do not install the equipment in damp, water-exposed, or condensation-prone areas. Ensure no condensation or liquid enters the equipment.
The installation environment must comply with the following requirements:
- The environment must be clean, dry, and designed for indoor installation. Avoid direct sunlight, rain exposure, snow accumulation, or condensation.
- Ensure walls, floor, and ceiling are level, flat, and completely watertight. Remove all dust and iron filings from the environment before installation.
- Do not install the equipment in an area with strong vibration, noise, or electromagnetic interference such as microwaves or other electronic sources.
- Do not install the equipment in areas with corrosive or conductive dust, volatile or corrosive gases, organic solvents, or strong radiation.
- Ensure the installation site altitude does not exceed 3000 m, and that the installation temperature and humidity are within the technical specification ranges.
- Keep the equipment out of reach of children and away from daily working or living areas (studio, bedroom, lounge, living room, kitchen, home theatre, sunroom, toilet, bathroom, laundry, and attic).
Handling and Moving the Battery
To prevent injury when moving heavy objects, select an appropriate method based on the product weight. The battery weighs 109 kg.
Select a suitable method for moving the equipment according to the following weight guidelines:

| Weight Range. | Method | Recommended |
|---|---|---|
| < 18 kg (40 lbs) | Manual handling | 1 person |
| 18 ~ 32 kg (40 ~ 70 lbs) | Manual handling | 2 person |
| 32 ~ 55 kg (70 ~ 120 lbs) | Manual handling | 3 person |
| 55 ~ 68 kg (120 ~ 150 lbs) | Manual handling | 4 person |
| > 68 kg (150 lbs) | Moving device | Forklift |
The SS-16kWh-F-BATT-IP21-00 weighs 109 kg. A forklift or equivalent mechanical equipment must be used when moving the unit.
Floor-Mounted Installation
In a floor-mounted installation the battery stands upright on the floor (clearance L = 0) and is also anchored to the wall for stability, using a single hook at the top. Because the floor carries the weight, fewer wall fixings are needed than for a wall-mounted unit. The optional wheels may be fitted for repositioning.
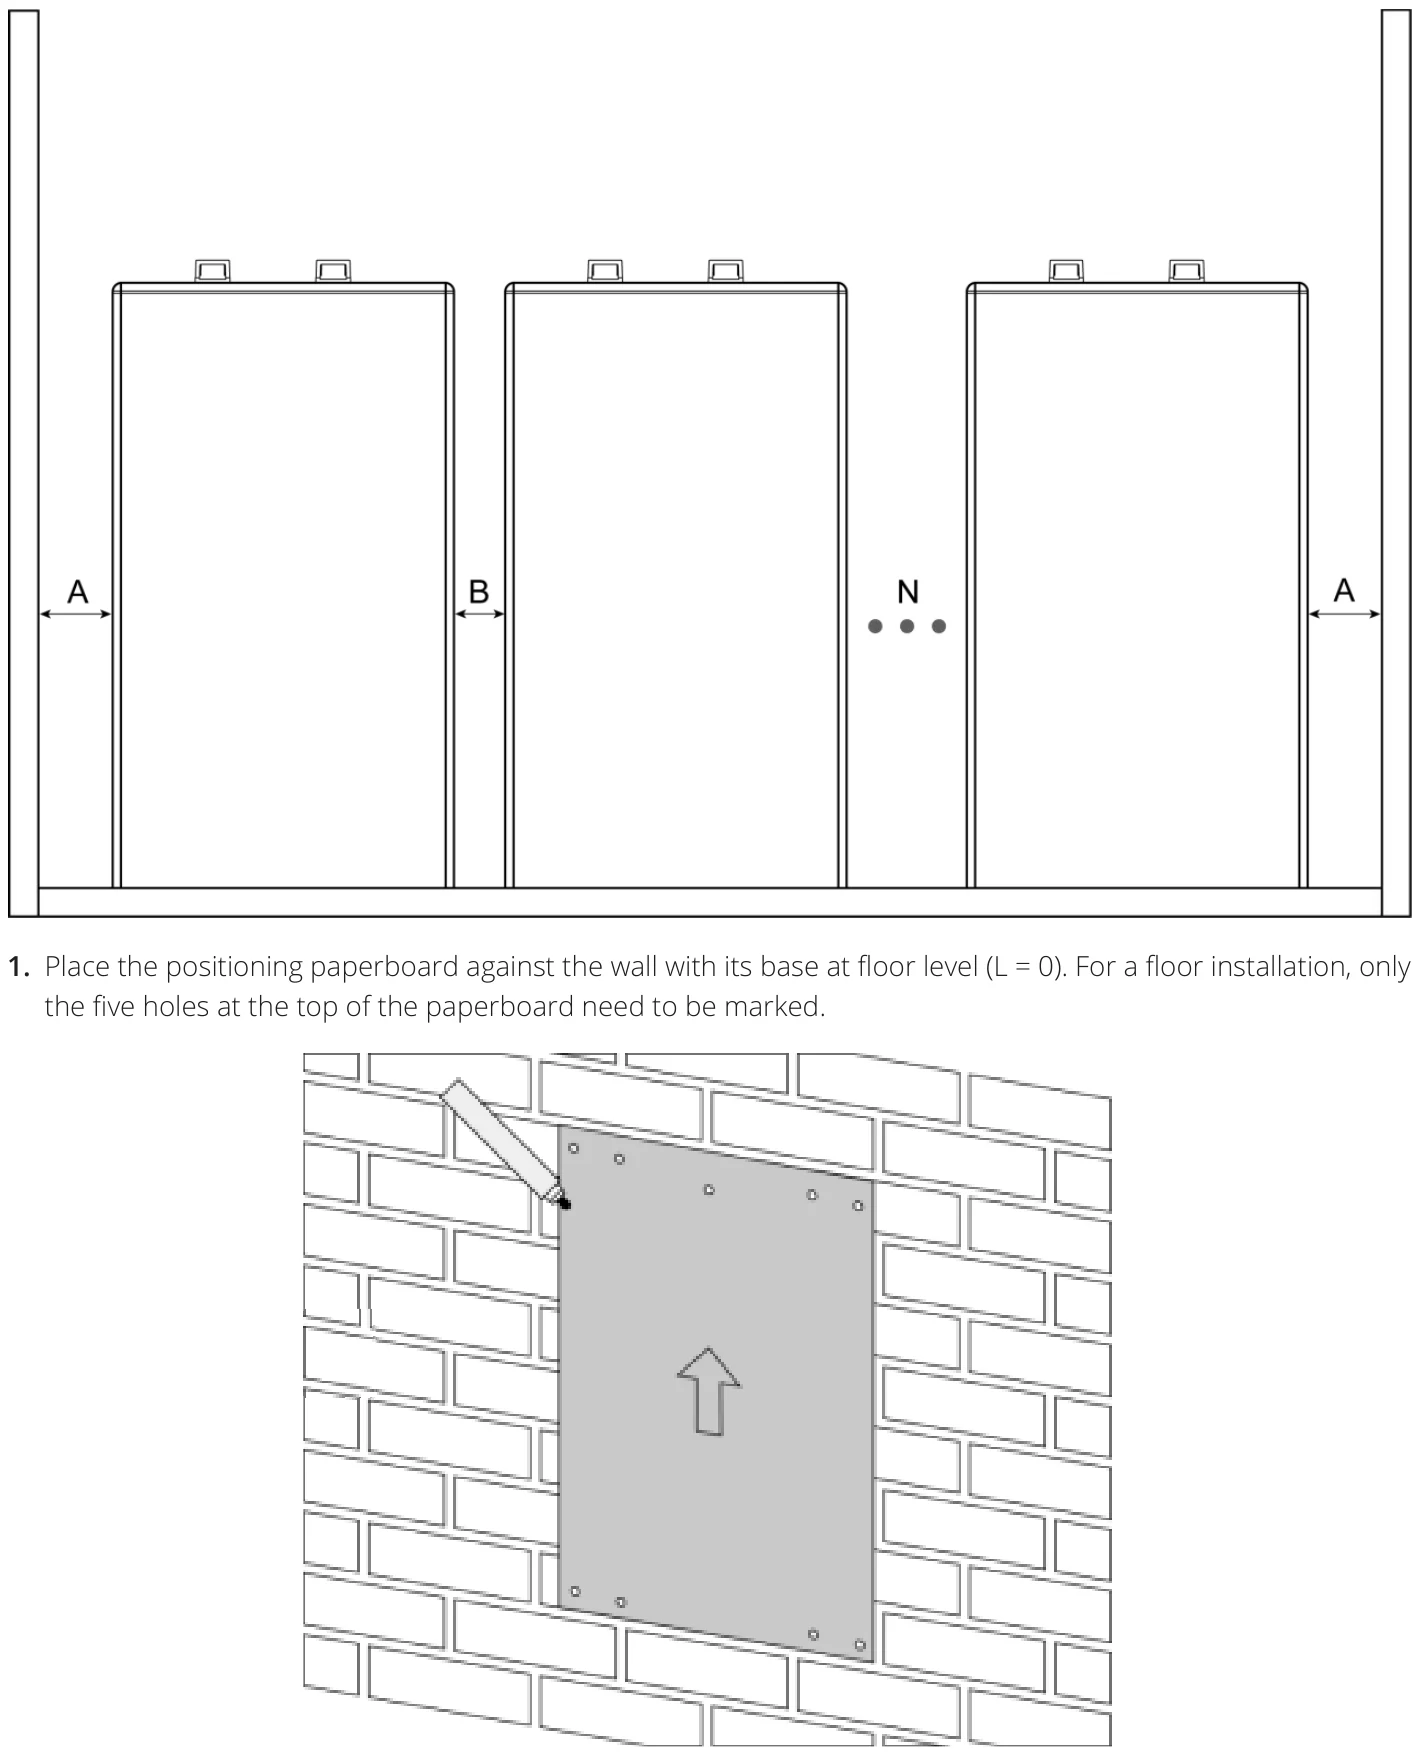
Provide the following minimum clearances for airflow and access. Clearances A and B are shown in the diagram below.
- Place the positioning paperboard against the wall with its base at floor level (L = 0). For a floor installation, only the five holes at the top of the paperboard need to be marked.
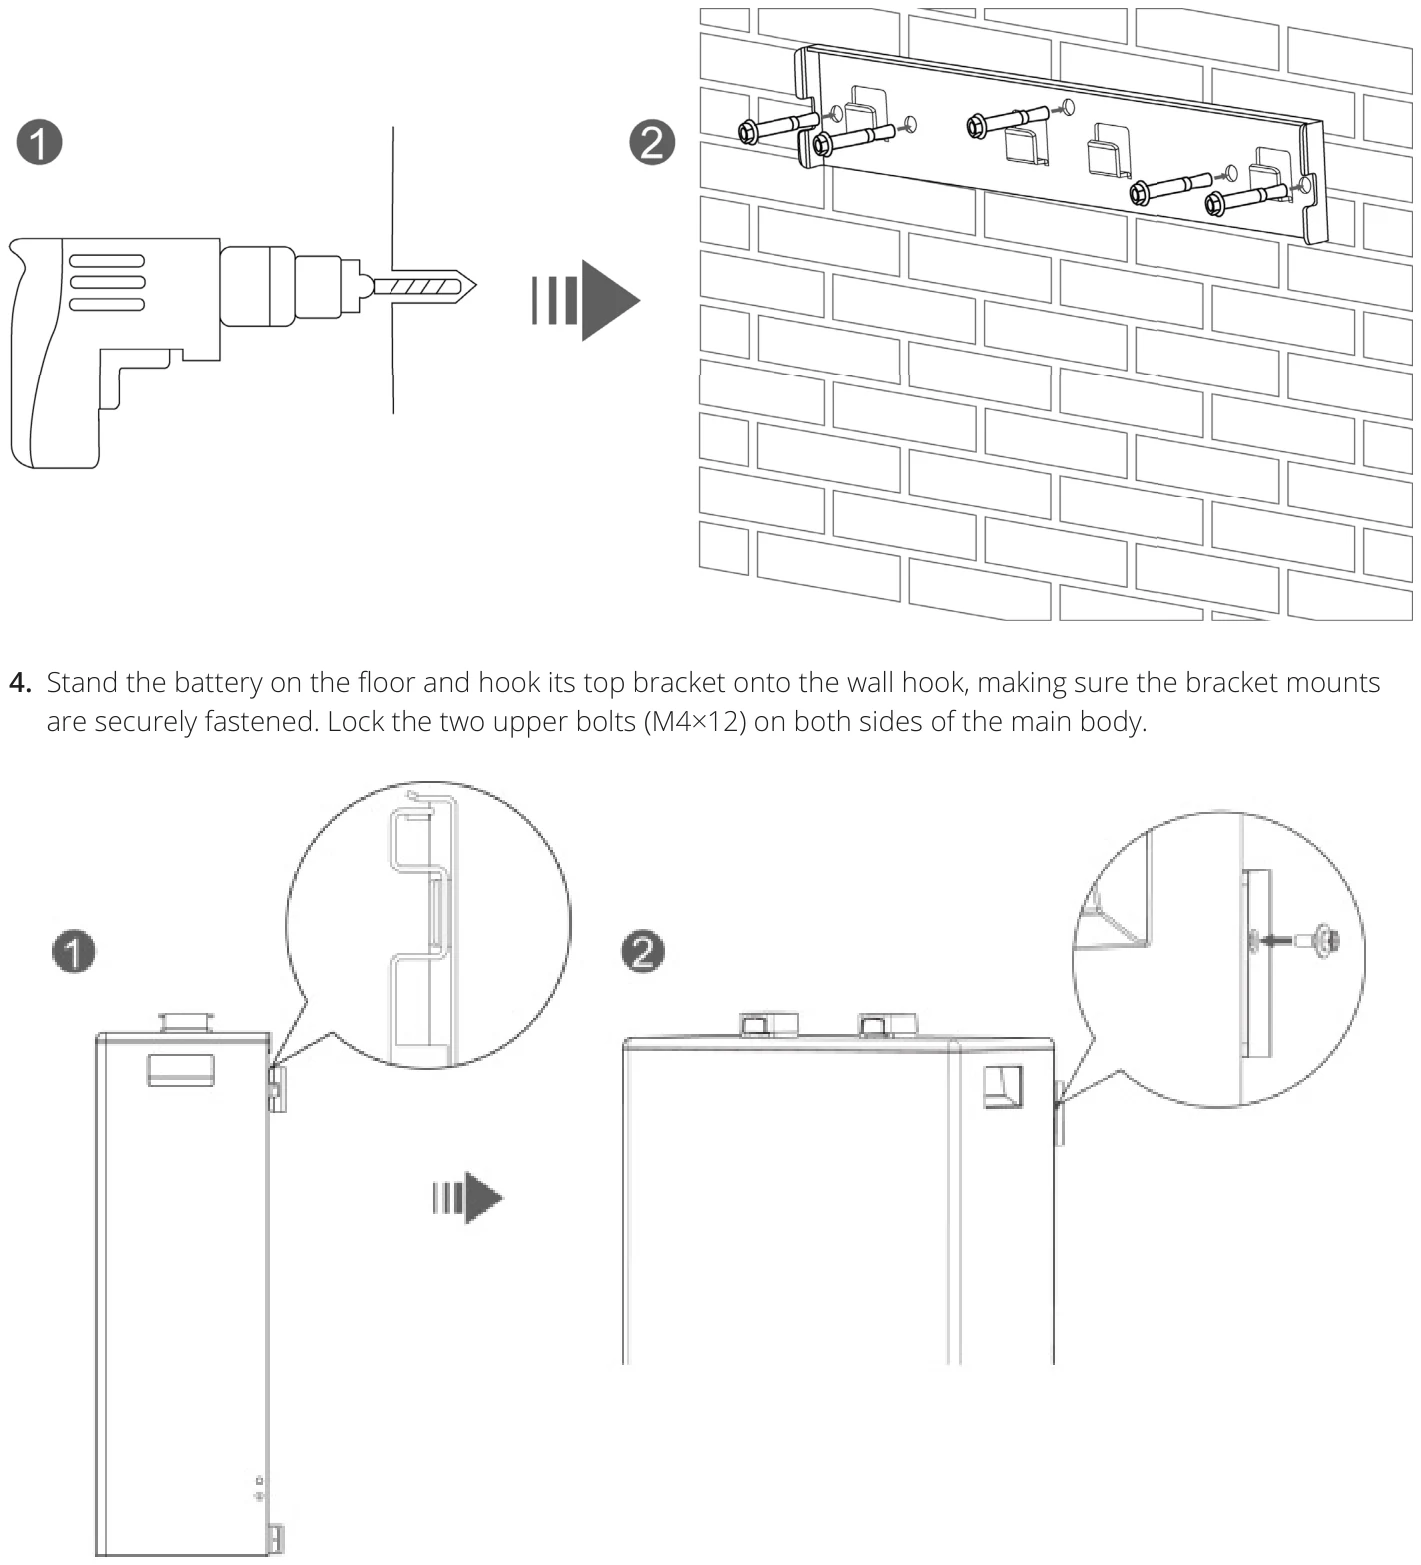
- Drill 5 holes in the wall, diameter 8 mm and depth 100 ~ 110 mm. Take care to prevent dust from entering the battery, and clean the floor after drilling.
- Fix 1 hook to the wall using 5 expansion bolts (M6*100).
- Stand the battery on the floor and hook its top bracket onto the wall hook, making sure the bracket mounts are securely fastened. Lock the two upper bolts (M4×12) on both sides of the main body.

| Item | Minimum Distance (mm) |
|---|---|
| A — Lateral clearance | 200 |
| B — Front and rear clearance | 100 |
| L — Base of positioning paperboard above the floor | 0 |
Wall-Mounted Installation
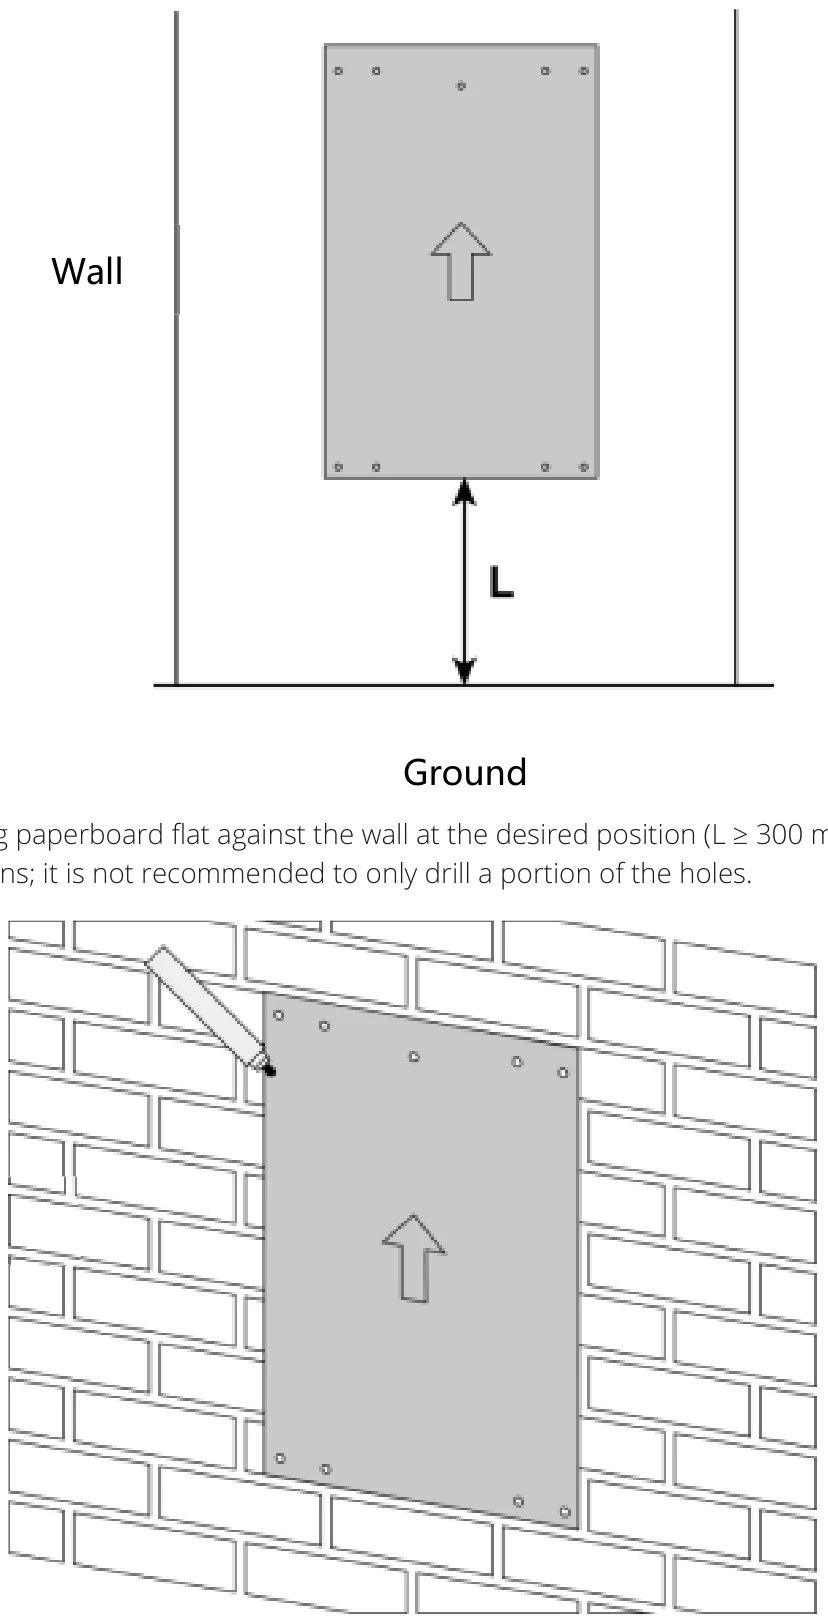
In a wall-mounted installation the battery hangs entirely on the wall (clearance L ≥ 300 mm between the floor and the base of the positioning paperboard), supported by two hooks. Ensure the wall is solid, load-bearing and able to safely support the 109 kg unit, and maintain the A (200 mm) and B (100 mm) clearances for airflow.
- Place the positioning paperboard flat against the wall at the desired position (L ≥ 300 mm above the floor). Mark all hole positions; it is not recommended to only drill a portion of the holes.
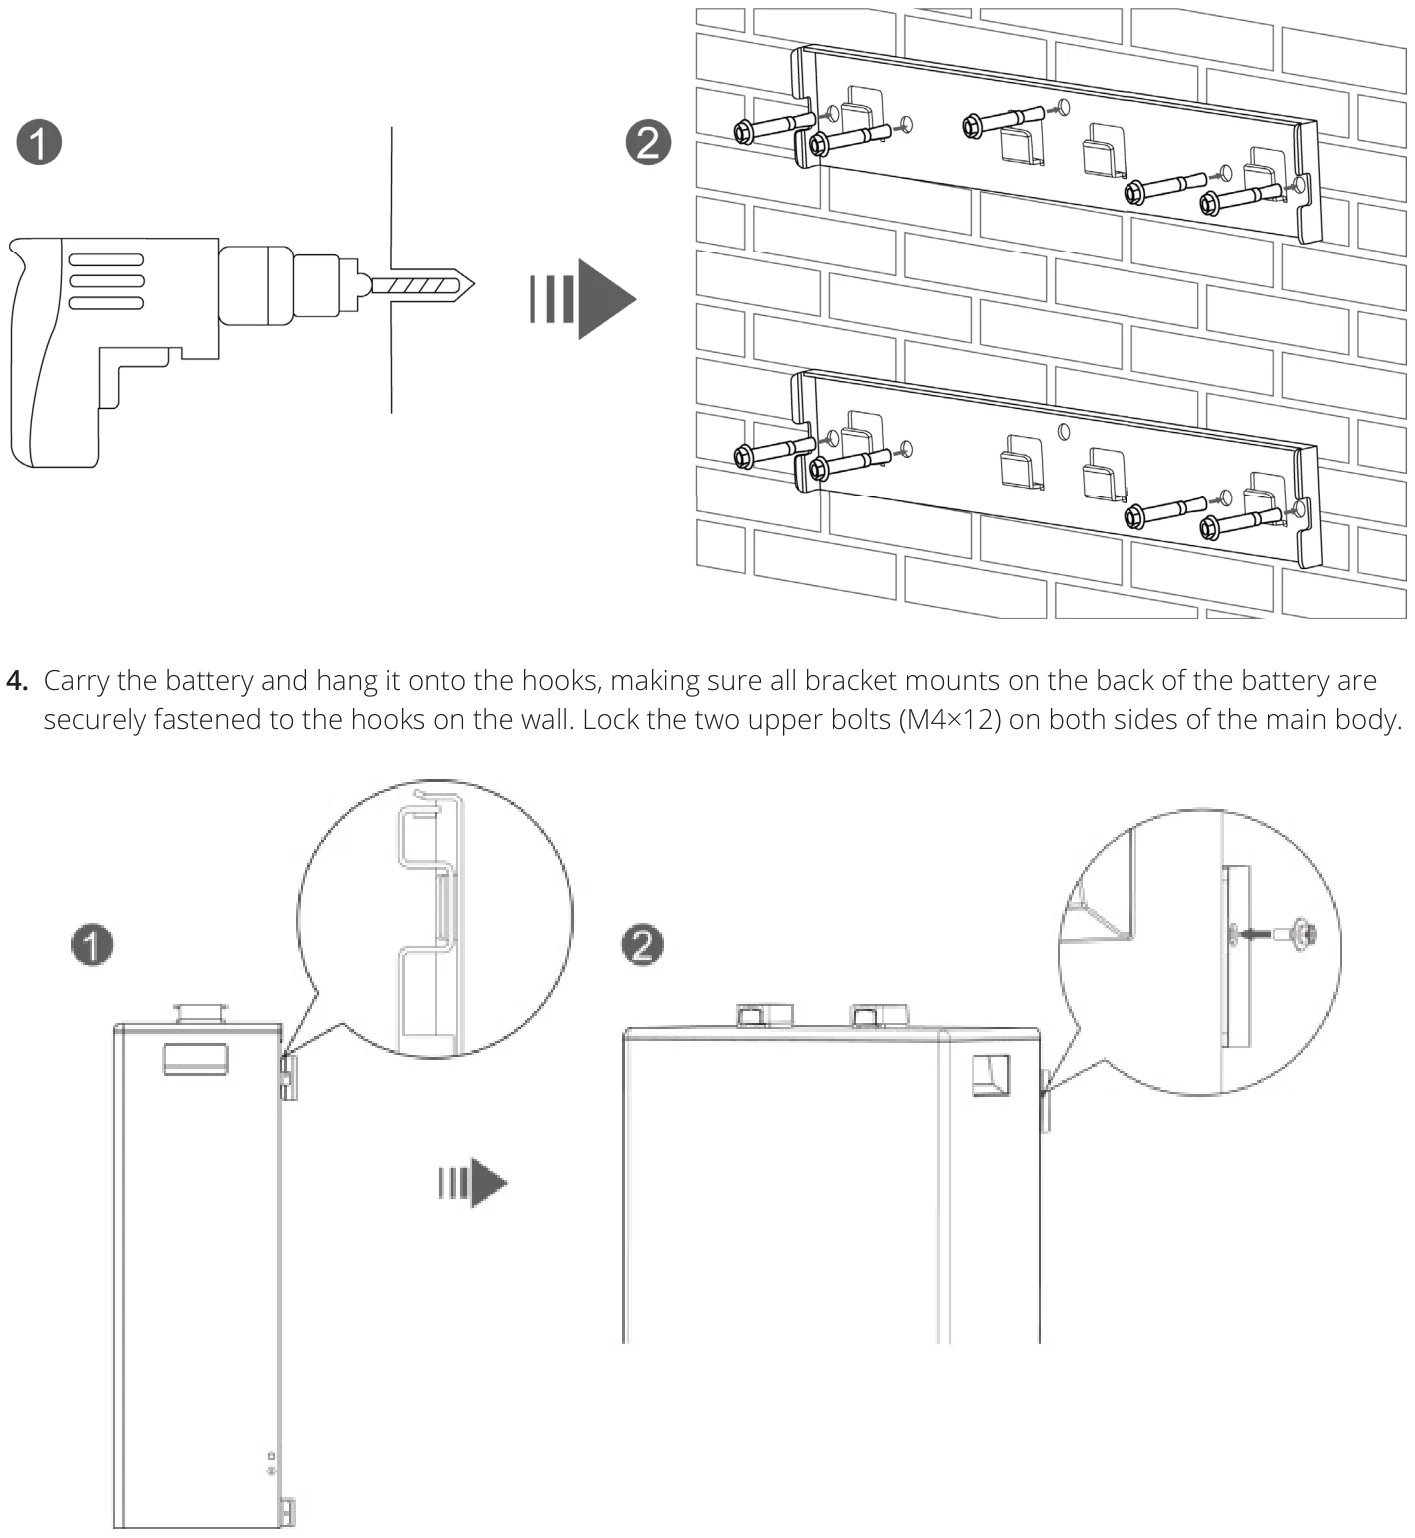
- Drill 9 holes in the wall, diameter 8 mm and depth 100 ~ 110 mm. Take care to prevent dust from entering the battery, and clean the floor after drilling.
- Fix 2 hooks to the wall using 9 expansion bolts (M6*100).
- Carry the battery and hang it onto the hooks, making sure all bracket mounts on the back of the battery are securely fastened to the hooks on the wall. Lock the two upper bolts (M4×12) on both sides of the main body.
Stack-Mounted Installation
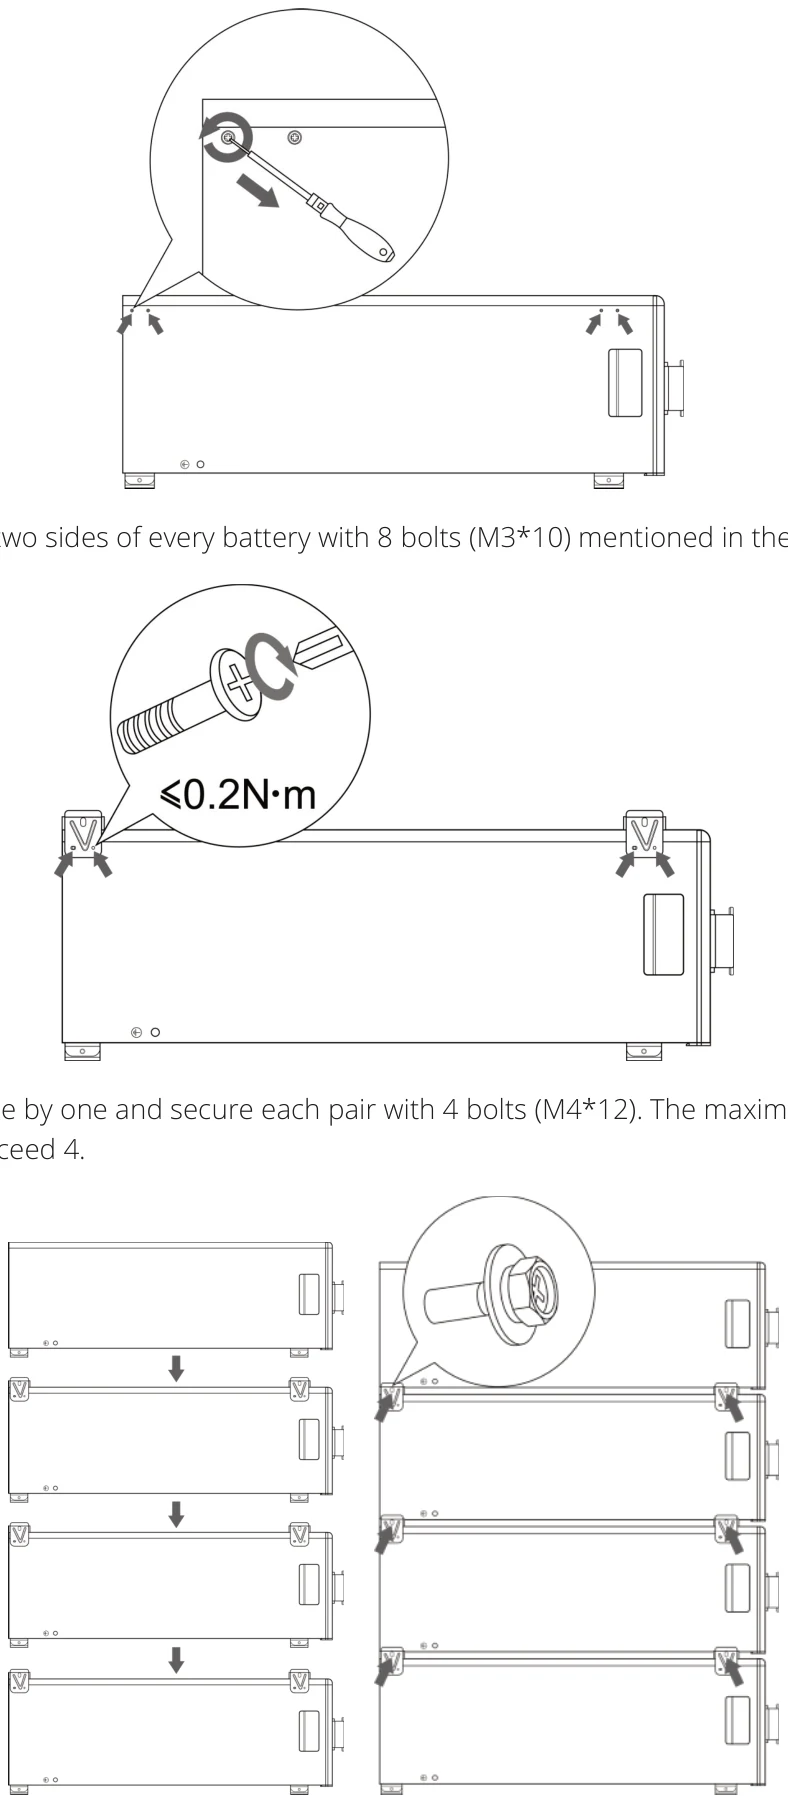
A maximum of 4 units may be stacked. Do not exceed this limit.
- Remove the 8 bolts (M3*10) pre-installed at the factory on every battery unit. Set aside for reuse.
- Secure 4 brackets to two sides of every battery with 8 bolts (M3*10) mentioned in the step 1.
- Stack the batteries one by one and secure each pair with 4 bolts (M4*12). The maximum number of stacked batteries must not exceed 4.
Mounting the Wheels (Optional)
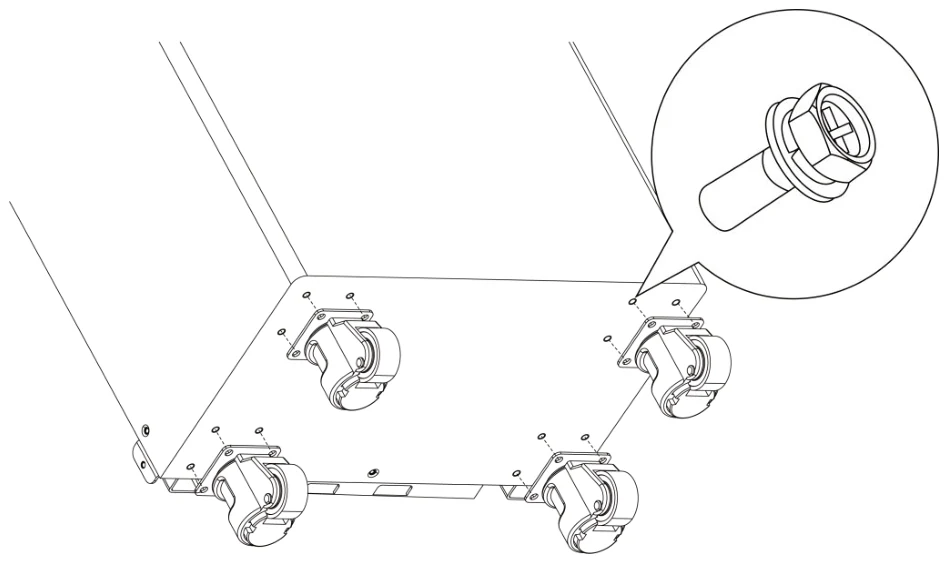
- Align the 4 wheels with the holes located at the bottom of the battery.
- Secure each wheel using 16 bolts (M5*12).
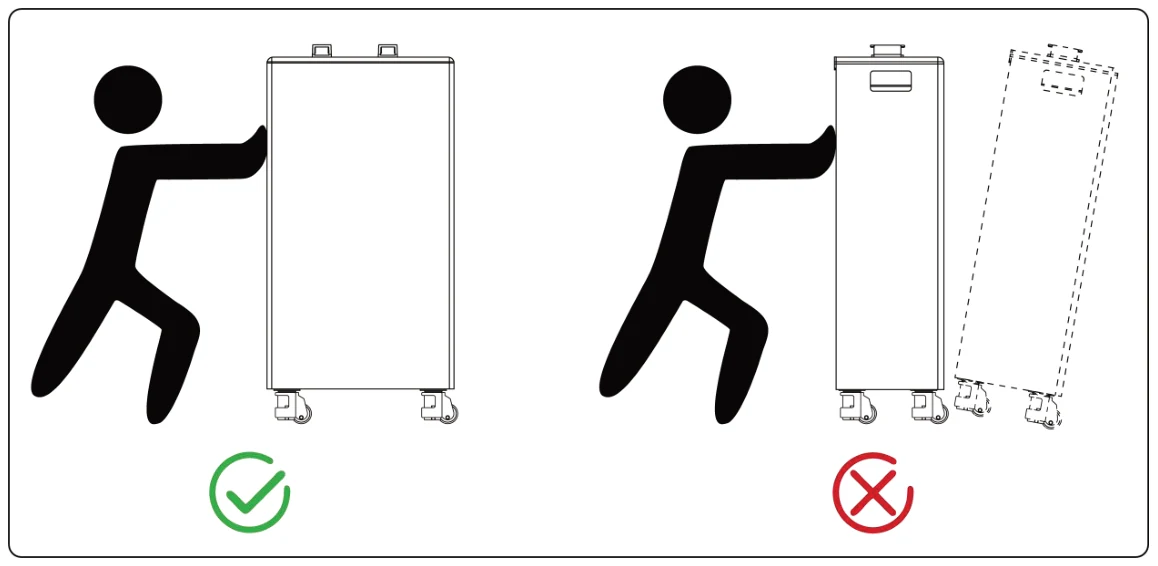
- When moving the unit, push in the direction indicated in the reference diagram.
Push the device with wheels in accordance with the direction shown in the diagram below.